Costco Passport Photo

How idPhotoDIY works
Create your passport / visa photos online for printing and online submission


How it works

1. Take a picture

Use a white wall as background, take several photos with a camera or smartphone

2. Crop the photo

Crop your photo to the correct ID or passport size photo. Over 50 templates available!

3. Download and print

Download your photo and print it at any photo store or online. Single digital photo is also available.

When it comes to getting a passport photo, there are a variety of options available to you. You can either take the photo yourself or you can go to a professional photography studio. However, one option that many people overlook is getting their passport photo at Costco.

Costco is known for its bulk products and low prices, but did you know that they also offer passport photo services? Not only is it convenient to get your photo while you're doing your shopping, but it's also affordable.

Unfortunately, Costco doesn't take passport photos in stores anymore. However, passport photo printing services are only available through the online Photo Center.

How to get Costco passport photos online?

First, you'll need to have a Costco membership. If you don't already have one, you can sign up online or in-store. Once you have a membership, you can visit the Costco Photo Center website.

On the website, click on "Passport Photos" under the "Shop" tab. You'll then be prompted to enter your location, so that the website can find the nearest Costco Photo Center to you. You can also choose whether you want a set of two passport photos or four.

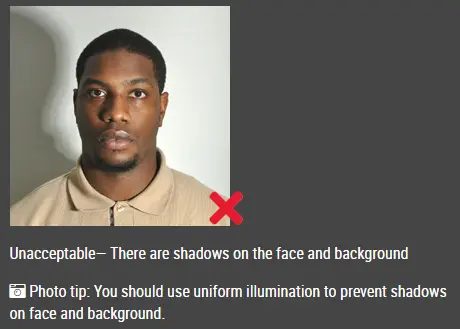
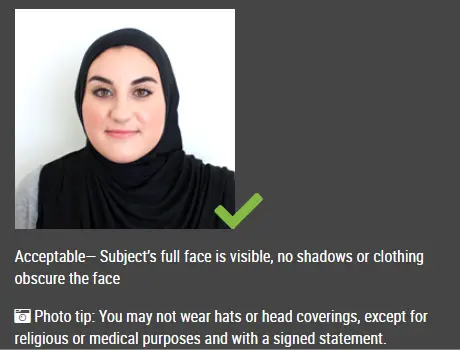
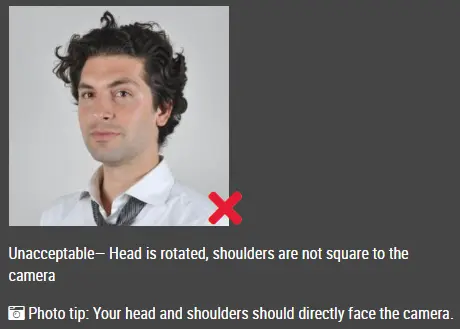
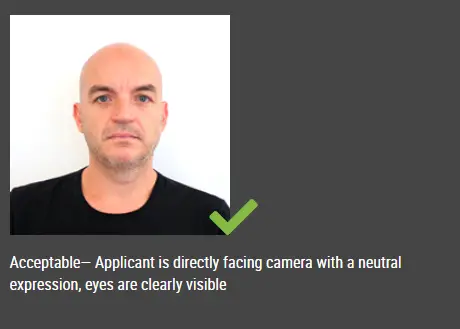
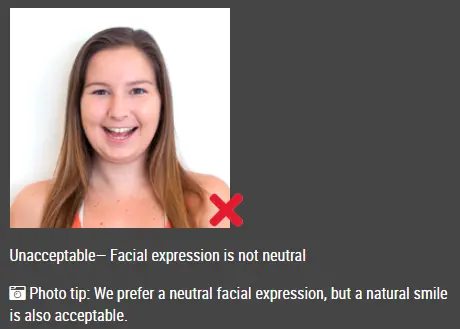
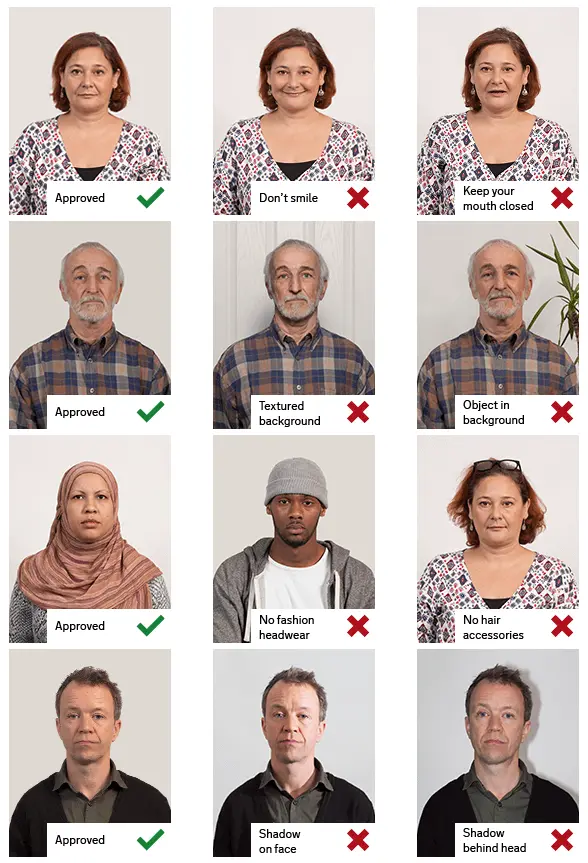
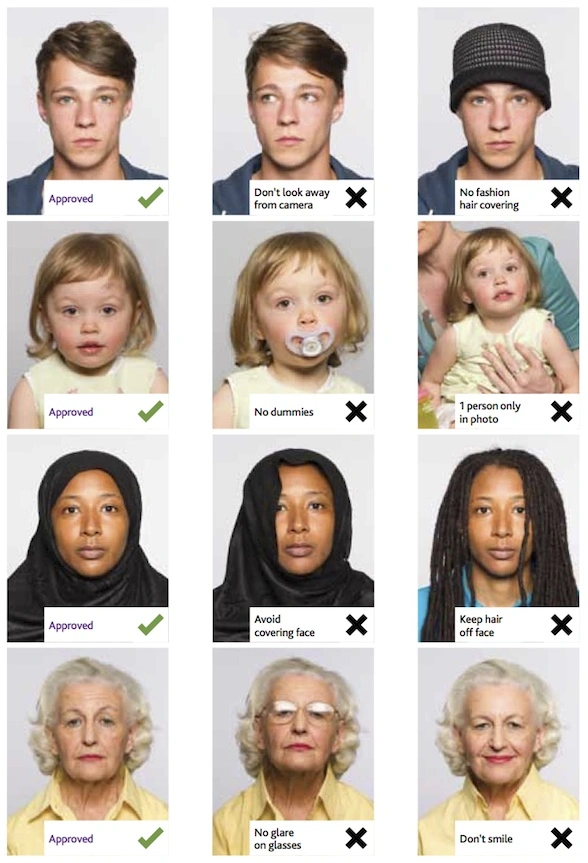
Next, you'll need to upload a photo of yourself. Make sure that the photo meets the requirements for a passport photo - it should be a recent, color photo of your full face, with a plain white or off-white background. You can take the photo yourself with a digital camera or smartphone, or have someone else take it for you.

Once you've uploaded your photo, you can place your order. You can pay for your order online and then pick up your photos at the Costco Photo Center.

Get Six US Passport Photo For 17 Cents at Costco!

A set of six USA passport photos will only cost you 17 cents! We provide a passport photo editor that allows you to create passport photos that meet all the requirements and we also have a 4x6 passport photo template that you can download and print at Costco. Upload the printable passport photo template, then pay $0.17 for the order. You will get six USA passport photos for only $0.17.


Click here to make passport / visa photos

Other passport pictures guides

How to take passport photo in 5 steps?


Step 1: Use a digital camera or a smartphone to take a photo

Find someone to take the photo for you and selfie photo is not acceptable for passport photo application. If you have a tripod, use it. A tripod will make it easier to keep the camera steady and level. The distance of the person to the camera should be around 1 meter.


Step 2: Find a venue with good lighting

When taking photo, you should face the light, such as a nice bright window or the door. This can provide even lighting to avoid shadows on the face and background. The face must be evenly lit. There should be no shadows and glares on the face.

Note: No need to worry about the background as our online passport photo generator will automatically remove or change the background for you.

unacceptable passport photo


Step 3: Wear properly for your passport photo

Do not wear uniforms. Wear regular street clothes in your photo.

Do not wear eyeglasses. If you wear glasses, sunglasses, or tinted glasses, take them off for your passport photo.

Your face must still be fully visible.  Don’t let your hair drape over your face and obscure your eyes. If you have very long bangs that cover your eyebrows, you should pin them back with bobby pins. It’s best if your ears show, as well, but that won’t cause your photo to be rejected.

No hats are allowed in passport photos unless it is religious headgear such as a headscarf or yarmulke that you wear every day.

acceptable passport photo

Step 4: Pose for a passport

Look straight towards the camera with face straight on. Head should not be tilted or rotated.

Both ears showing or both edges of the face visible if hair covers the ears.

Shoulders should be visible, and there should be enough space around the head for cropping the photo.

Position the camera in the same height as the head.

unacceptable passport photo

unacceptable passport photo


Step 5: Have a neutral facial expression

You can smile in your passport photos, but the government prefers that you have a neutral facial expression.

Smiling or having your mouth open is usually not acceptable, especially under the new international passport rules.

acceptable passport photo

Unacceptable passport photo


Good and bad passport photo examples

Example of passport photos

Printed passport photos

Online Passport Photo Generator

Is this document useful?